In July 3, 2012 I decided to buy a used D&R Cinemix 2 to replace the old Mackie I had in my studio. D&R is a Dutch Company that used to make great sounding
studio consoles and P.A. mixers starting from 1972 along with what maybe are the most used broadcast consoles in the radio industry. The Cinemix is an analog console that
was first launched in 1998, then evolved in a second version in 1999. It was conceived for the film and television industry as it is capable of mixing down to the 5.1
surround sound standard, and offers a wide variety of nice features, some of which were stock with every unit sold, others were optionals.
My console is configured with 32 mono inputs + 4 stereo inputs, but since all channels are a dual path design, everything is practically doubled, so it has a total of 72 inputs and
and has the whole set of motorized faders, 36 long 100mm ALPS motorfaders for the MIX section plus other 36 60mm motorfaders for the CHANNEL section.
The original automation system
The system used by D&R, at the time, was based on a MS-DOS software called PowerVCA that runs only in a pure MS-DOS environment. When I bought the console, I received an old 586
PC with very noisy fans, which was the CPU used for the automation. For those who don't know how automation worked in the analog tape era, here's a brief explanation:
a new tape was "striped" with a sync signal (called SMPTE) which was then "translated" by the software into the information of absolute time elapsed from the
beginning of the tape, this way the automation program had a reference in sync with the audio material and could record and playback all faders and mute buttons
movements in time. But now that we record digital audio on our computers, it's not so practical to have a second, slow, noisy, dusty and ugly computer for
just doing the automation task. So my idea was to find a way to bring the console automation directly into the DAW software via a plugin that could seamlessly
integrate and work along with the song, and fortunately the D&R automation is based on the good old MIDI.
Hacking the PowerVCA
I had to discover the protocol used by the mixer and the PowerVCA to communicate between them. The 586 PC has an old ISA MIDI card, model Music Quest MQX-32M.
That particular type of card was maybe chosen because it offered two pairs of independent MIDI ports. Why two pairs were necessary? I discovered this
later on, when I found out that the MIDI DIN5 connectors are effectively isolated inside the mixer circuitry, and the MIDI signals are found on the ASYNC INTERFACE
hosted on a DB25 connector. All I had to do was to find the correct wiring in order to build a special cable that could give me the possibility to interpose my
computer between the console and the 586 PC so that I could monitor the MIDI message going through the units and draw a map of the correct messages for each function.
The schematics book was very useful on this, and following the right wires was the way to go, so I found out that the scheme used for the connections in the DB25 was
exactly the same as the one used in the DB9 connector of the MusicQuest card.
Once I had found all the useful messages, I could start to write my own automation program. The idea was basically to create a bridge between the MIDI
automation used by the D&R and the VST automation used by the host, for this reason I have called the plugin "VST Automation Bridge".
The plugin is loaded as a normal virtual instrument, is controlled by the console as if it were a synth that is controlled by a generic MIDI controller,
then the sequencer stores the automation and plays it back on the plugin, which, in turn, translates all fader and mute movements back into MIDI for the console.
This way, the touch faders and all SEL buttons are no longer used for selecting which control must be recorded or played back. However, they are used in another way:
when you activate the MIDI control, all faders are set to AUTO mode, when you touch a fader it is automatically set to WRITE but I noticed that touching more than
2-3 faders at the same time not always works, so I let the user to use the SEL switches in case it's necessary to make manual selections.
And since the master fader isn't motorized and has no touch sensor, now the master SEL switch activates the same mode on all faders.
You want it?
If you're reading this page it's likely that you have a Cinemix and you are interested in trying this system, right? Well, here's what you have to do:
First you need to make the special MIDI cable.
The reason why the Cinemix uses two pairs of MIDI ports is that one pair controls the left (or low) part of the console, which comprises the first 24 channel strips, and the
other pair controls the right (or high) part of the console, which comprises all channels above 25 plus the master section. With Cinemix2, you can find out how your
console is configured by pressing SETUP and then the left arrow key. Mine says "LO=24 HI=12 MSTR=hi".
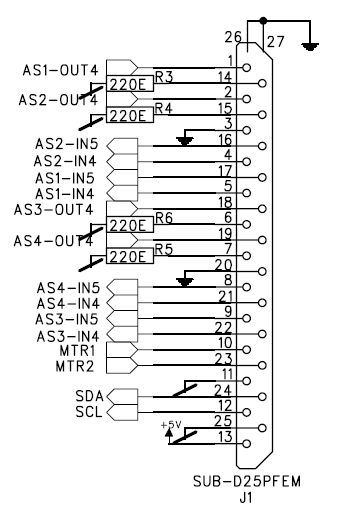
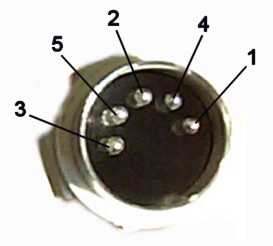
You need 4x DIN5 male plugs and one male DB25, or you can use the DB25-DB9 cable that you are using to connect the console to the PowerVCA computer and make an
adapter, in this case you need a female DB9. Soldering the wires is very easy, the pinout is the same at both DB25 and DB9 ends:
Pin 1: MIDI+ OUT 1 to DIN pin 4
Pin 14: MIDI- OUT 1 to DIN pin 5
Pin 2: MIDI+ OUT 2 to DIN pin 4
Pin 15: MIDI- OUT 2 to DIN pin 5
Pin 3: MIDI ground to (out) DIN pin(s) 3
Pin 16: MIDI- IN 2 to DIN pin 5
Pin 4: MIDI+ IN 2 to DIN pin 4
Pin 17: MIDI- IN 1 to DIN pin 5
Pin 5: MIDI+ IN 1 to DIN pin 4
You can find this scheme in the schematics book at page 34 (AS Con./DigPower).
You need a MIDI interface with at least two free MIDI inputs and two free MIDI outputs. Once you have connected the console to the MIDI interface, you can test if the
connections are OK by using a MIDI testing software. In Windows we have the freeware MIDI-OX. Set up the I/O ports and send the following message to both outputs:
Continuous Controller #127 with value 127 on Channel 5. If everything is OK, you'll be able to monitor the messages coming from the console in MIDI-OX and you'll
notice that moving the Joysticks will not move he XY LEDs any more, this is because the console is now in remote control MODE and has interrupted the connection
between its controls (faders, mutes and joysticks) and the corresponding internal analog controls. You can release the console from MIDI control by sending a single
MIDI byte with value 255 (FF), or simply turn it off and then back on.
Now you can test the program. Create a song in Cubase/Nuendo, press F11 and load CinemixAutomationBridge in a free instrument slot. Do not create a MIDI track for it,
it's not necessary. Make sure that Cubase (or whatever VST host) is not using the MIDI ports you've connected the console to, because they will be opened by my VST
directly.
Now, in the VST interface, click on the MIDI icon on the top right corner and select the proper input and output ports. Now take a long breath and click ACTIVATE. If
everything went right (most importantly, if the MIDI cable was soldered the right way!), you will see the console to reset, all faders will go to infinite (all the
way down), all MUTES will turn off and all R and W LEDs will be on. Everything you move on the console is reflected on the plugin's interface and viceversa.
To record and playback automation, use the R/W functions provided by the host. For example, in Cubase/Nuendo, you will find the R/W buttons directly on the window
frame around the plugin's interface. Click W, R will also become green. Play your song and move some faders. Now rewind your song and play it back again. Automation
is now stored along with the song.
Note that only used automation will be stored in the song. If you, for example, start with channel 4 at -3 dB and never move that fader, that position will not be
stored. I have added a "Send Snapshot" button for this, you will have to send the snapshot at the beginning of the song at an empy bar.
The button RESET ALL will make a full reset, the button ALL MUTES will toggle the status of all mutes, and if you want to amuse your friends, click TEST MODE.
Disclaimer: This plugin is FREEWARE, can be used without limitations of any kind in either personal, educational or commercial projects.
Can NOT be redistributed, decompiled, modified, sold. This software is NOT SUPPORTED, is supplied "AS IS" and the author can not be held responsible of any
consequences of its usage.
This website and its author are not affiliated with D&R. This is NOT a D&R product, please don't contact D&R for support about this product.
Technical notes: This plugin is not compatible with Pro Tools and with the FXpansion's VST-RTAS Adapter (problem of frozen interface). It was designed around the
particular configuration of my own console (24 + 4 + 8 channel strips), this means that can work with consoles with up to 36 channel strips.
It is not guaranteed that it works with other D&R consoles compatible with the PowerVCA automation (Octagon, OrionX, Merlin).

 I had to discover the protocol used by the mixer and the PowerVCA to communicate between them. The 586 PC has an old ISA MIDI card, model Music Quest MQX-32M.
That particular type of card was maybe chosen because it offered two pairs of independent MIDI ports. Why two pairs were necessary? I discovered this
later on, when I found out that the MIDI DIN5 connectors are effectively isolated inside the mixer circuitry, and the MIDI signals are found on the ASYNC INTERFACE
hosted on a DB25 connector. All I had to do was to find the correct wiring in order to build a special cable that could give me the possibility to interpose my
computer between the console and the 586 PC so that I could monitor the MIDI message going through the units and draw a map of the correct messages for each function.
I had to discover the protocol used by the mixer and the PowerVCA to communicate between them. The 586 PC has an old ISA MIDI card, model Music Quest MQX-32M.
That particular type of card was maybe chosen because it offered two pairs of independent MIDI ports. Why two pairs were necessary? I discovered this
later on, when I found out that the MIDI DIN5 connectors are effectively isolated inside the mixer circuitry, and the MIDI signals are found on the ASYNC INTERFACE
hosted on a DB25 connector. All I had to do was to find the correct wiring in order to build a special cable that could give me the possibility to interpose my
computer between the console and the 586 PC so that I could monitor the MIDI message going through the units and draw a map of the correct messages for each function.
 Pin 1: MIDI+ OUT 1 to DIN pin 4
